 |
| Of course, only after I finish and take these photos do I realize
that the nose gear is a little “knock-kneed.” |
I received Zvezda’s gorgeous A320 kit for Christmas. The apparent onset of old age prevents me from remembering if it was Christmas 2015 or 2014. It doesn’t really matter. What matters is that it sat around for a while as I finished up other projects. With as slowly as I build now, I’m lucky to finish four models a year, but I take my time and enjoy it much more than I did when I was younger and didn’t care much about making things the very best that I can. Now, if I get frustrated or bored, I just stop. Sometimes I completely stop, box it all up, and put it away while I move on to something else that piques my interest.

In the case of the A320, I never really took a breather, and for good reason. It’s a really enjoyable kit to build, maybe in part owing to the ability to build it in landing/take-off mode – full flaps, slats, and even uncompressed landing gear as it would have in the air (not to mention an optionally open cabin door, which I had no interest in.) This is something I’d wanted since I was a kid and no model manufacturer delivered on mainstream civil airliners, or even most military aircraft. It never felt right. Sure, in flight and at the gate, most planes will be buttoned up with flaps and slats fully retracted, but once past the gate, the pilots drop them to get ready for take off. That, in my mind, is what I see when I think of a plane. Rolling out onto the tarmac, creeping along, wings bouncing a bit as the plane crosses breaks in the concrete, and then the whir of motors as the flaps slowly extend out and down.
Airliners were a favorite of my younger self. For whatever reason, I get more excited by these busses-of-the-air than an armed-to-the-teeth fighter or bomber. But I like utilitarian things, and most airliners are nothing if not utilitarian.
Things have changed a lot since I built those kits long ago. New kits, like this Zvezda offering, are significantly more accurate and detailed than their predecessors – which, surprisingly, are coming back into production again for us middle-aged guys to buy on impulse in an attempt to relive our collective childhoods. Seriously – there’s really something to walking into a hobby store and seeing the same Boeing 727 kit sitting there on a shelf that you found on another shelf in another store 30 years ago. It’s hard to resist, and I have to admit that I gave in to that impulse and so have a 727 sitting in my collection waiting to disappoint me. After this A320, it’s going to be hard to settle for the soft details and abundant imperfections of a model kit that was already old when I first built it in the 80s. Nostalgia is powerful, but not powerful enough to divert my interest in the A320.
But enough reminiscing and so on.
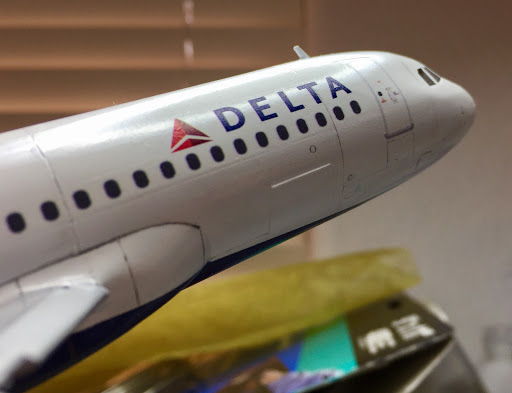
My aim: build Zvezda’s A320 (which comes with Russian Aeroflot livery) as Delta Airlines, and I purchased an aftermarket set of decals from Draw Decal. Again, things have changed a LOT since I was kid. Back then, if you bought a model and it was under the name of some airline you didn’t know or care about, tough luck. You build what you got. Today, I can hit up any number of small companies that create specialty products, such as these decals, or even others who hand-craft very specific parts to alter the kit so you can recreate versions that can’t be purchased. I didn’t need to go that far, but I did need good decals, and Draw’s Delta livery is fantastic.
You know when you find out about something new, you just have to try it yourself? I learned
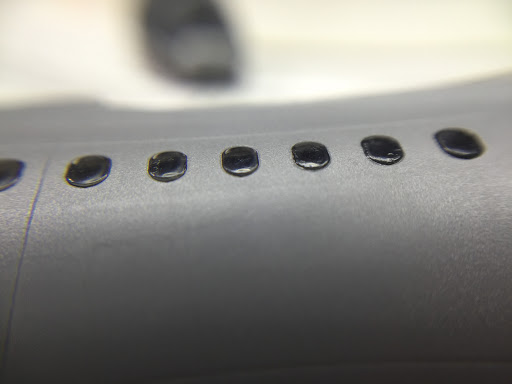
the hard way to really think about these things first before actually attempting them. In researching the best way to approach airliners, I found that many builders fill in the windows and use decals. This eliminates problems such as incorrect placement or size – maybe not such an issue on something modern and based off official plans and CAD as I suspect is the way it’s handled today, but older kits are notorious for being inaccurate. In the case of the Zvezda A320, I didn’t like how the windows fit into the fuselage – they protrude quite a bit and so couldn’t simply be filled to smooth out the hull. And the clear plastic that Zvezda includes in this kit is odd, to put it mildly. It almost feels like nylon – very bendable. That trait also makes it very hard to sand, and so I took the advice of some builders who touted the benefits of filling the windows.
But I didn’t think this through – I might remind you that I’ve only recently gotten back into this hobby, so some simple things have slipped my mind. Such as not globbing a bunch of putty onto plastic. It started out harmless enough – I ran a strip of masking tape down the body, covering all the windows, and then laid down a thick bead of Tamiya putty. Let it sit a few days and it should be good to go – nice and smooth, maybe requiring only a little touching up. That was not to be.
What I found when I removed the tape was a disaster, putting it mildly. The two halves of the fuselage were ruined, basically. What I had ignored is that other modellers were extolling the virtues of filling the dozens of holes in the fuselage halves not with putty but with EPOXY. For whatever stupid reason, I looked at my lovely little tube of Tamiya grey putty and dove in head-first. And if you know anything about putty, it’s basically plastic mixed with plastic cement, and plastic cement works by softening the plastic that it’s on so that another piece of plastic can be joined to it. So, basically, I just put a big tube of chemically-hot cement onto plastic and let it bake itself dry. The result?

 And so I dove in. This time, I opted to put up with the kit’s weird plastic windows and not experiment again. This was not a great choice, as it turns out. It took a tremendous, bordering on ridiculous amount of time and sandpaper to knock down the overly-thick windows. I probably didn’t help things by starting at 400 grit sandpaper, but it seemed less destructive than heavier grit. I felt like I needed to be careful this time, and so spent an hour here and there, many times, over quite a few weeks, until they were smoothed down. A coat of primer and some light filling/sanding and it looked smooth enough. These were, after all, going to be covered with decal-windows, so it didn’t need to be absolutely perfect. Unfortunately, all that sanding actually left a flattened area that extended pretty much the entire length of the windows, and I had to devote more time to more sanding to take the edge off. Next time: epoxy the windows.
 And because the kit offered an actual flight deck to put behind the clear plastic of the windshields, I opted to fill in some details and even add a captain and pilot to make it just that much more convincing.
 The only 1/144 scale figures I have are in the Bandai Millennium Falcon kit that I haven’t started yet, but I made the decision to sacrifice them as I know I’ll model that with its landing gear displayed, not in flight. So Finn and Han became two unnamed dudes in an airliner. I removed their “outer” arm just so they wouldn’t look so stiff and replaced them with goofy-looking arms that would reach the controls at each of their sides. Honestly, at maybe 3/8″ in size, the detail wasn’t worth the effort. In the painted model, you can only just make out that there are human shapes in there. Oh well.
 |
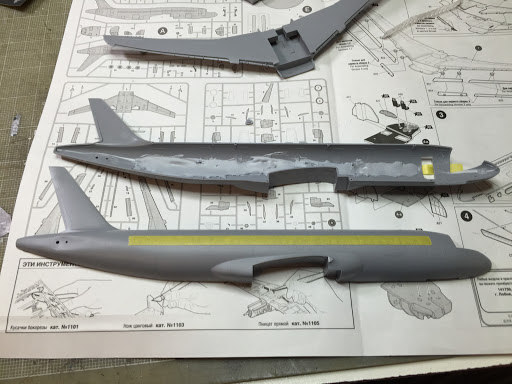
| Note the right half compared to the left half. |
I found that the wings, which are presented as three pieces – two top halves that cement to a full-width bottom section – left an ugly gap where they join the upper part of the fuselage. I played around with this and found that a section of the upper wings that overlaps with the fuselage is actually getting in the way (so much for precision engineering in modern kits, I guess) so I shaved each side down so the gap could close. I never quite got it to disappear completely, but it’s close enough that it wouldn’t require a massive effort to fill it.
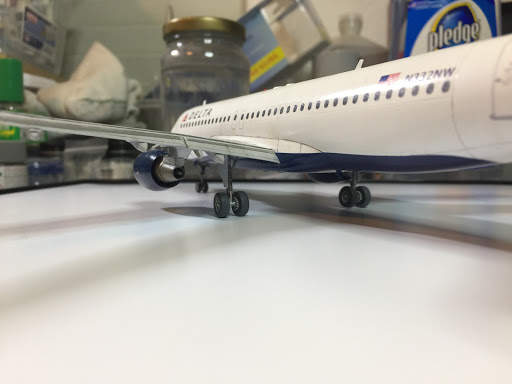
 It was at this point that I decided that I was going to model the plane in the air. I already had decided on full flaps and slats, but I wasn’t sold on which version of the landing gear to go with. If I wanted it to just sit flat, on the ground, then I needed use the standard gear like you would with most planes. In the past, it wouldn’t even cross my mind – I never even considered that the landing gear is just a massive piston that helps cushion the land, but thanks to this kit, I have the choice – normal gear or uncompressed gear, which shows off the telescoped-out, weight-unburdened end of the gear. That’s pretty neat, and so I decided this model needed to be in flight. I committed to this by drilling a hole in the bottom of the wing assembly that would fit a clear acrylic dowel.
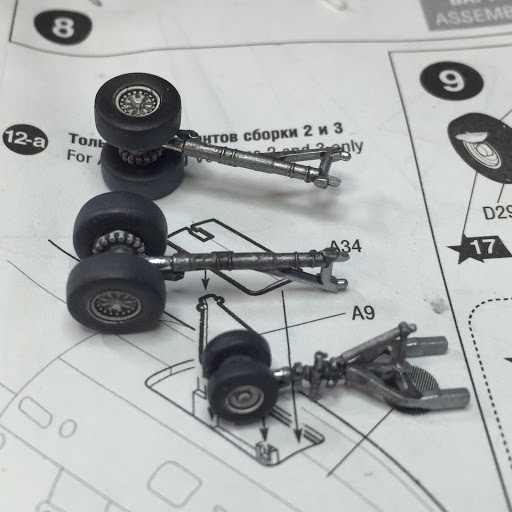
 I have become unapologetically detail-obsessed in my middle age, I guess, and so I spent an entire afternoon putting together the dozen or so pieces (3-4 pieces for each) that make up the landing gear and painting them. The wheel/tire units themselves are three colors – white for the hub, as is obvious in the pictures, but less obvious is that the “black” is actually two very dark shades of gray, a lighter tone to accentuate the worn surface of the tire, and then a wash over the hubs to bring out detail and make them realistically grimy. I’m rather pleased with how they came out, even if the photos don’t do them justice.
And so it was time to paint. I layered on some bright white Tamiya primer over the grey that I’d used earlier, and then masked off the lower section of the fuselage that would be navy blue – what I kept mentally referring to as the waterline, though unless your pilot is Capt. Scully, it’s unlikely that would mean very much. Normally I’d use the great Tamiya masking tape that I found out about when I got back into building, but here I used some thin vinyl tape, as it was the only thing that would allow me to make the deep curves necessary to achieve the correct look.
Hobby supplies are limited to what the local stores have on-hand, and in this case, they didn’t have the Tamiya X-4 that I really wanted, but also didn’t want to spend $10 to have it shipped from Amazon (not a Prime item, unfortunately.) They did, however, have some Model Master Acryl that matched and so I bought that. After I airbrushed this Acryl, I remembered why I switched to Tamiya for my airbrush paint.

I know some builders swear by this stuff, but Acryl and me do not get along when it comes to airbrushing. I grudgingly decided to use it and it bit me. Tamiya has been a really great, forgiving paint for me, and I really forgot how awful other paints are to work with. Acryl, for whatever reason, just doesn’t thin well with the suggested water or alcohol, and I didn’t even consider buying Testor’s own special mix Airbrush Thinner for the Acryl. I figured I could get by. It looked great… until I removed the tape, when big chunks of paint went with it. A little rubbing and more paint went with it. What a mess. I scraped what I could off and remasked, primed again with more white, and repainted. It worked out better the second time.
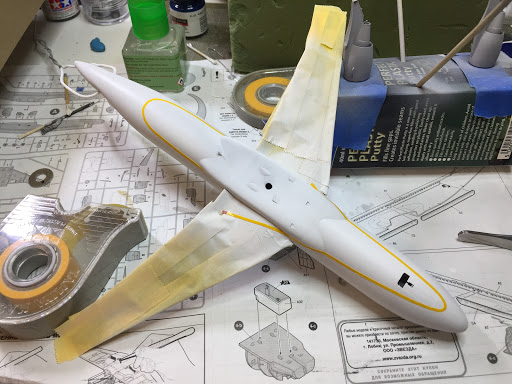
 I decided the standard Tamiya grey primer would suffice for the darker section of the wings that I see being referred to as “corrogard” (SP?) and so mixed up some Tamiya XF-19 (a warm-ish grey) and X-2 white, masked off the corresponding upper sections. From everything I could gather online the entire bottom of the wing was the same color, and, to be honest, I wasn’t too concerned with making the bottom of the wing obsessively accurate, which would only be seen if you actually examined it, even posed in flight. That might sound lazy, but I pick my battles, and this wasn’t one I really wanted to stress out over.
At this point, I decided to experiment a little by attempting to create some of the smudgy streaks that dot most well-used planes’ wings. Slats, flaps, and air-brakes are all things that get greasy and at hundreds of miles an hour, that grease seeps out onto the wings where wind spreads it across the surface. Some modellers love to make these shiny, pristine, near-glowing replicas, especially of airplanes, but I prefer the lived-in, well-loved look of equipment. Unless the airline has lots of money and time to throw around, few in-service planes are going to look the way they did coming out of the paint hangar.
 I grabbed a couple of drawing pencils, H and 4B (respectively, relatively hard and really soft) and scribbled small dots, then dragged straight back, smearing the graphite. I tried several things – q-tips, wads of paper towel, and finally my finger. The result was… okay. I wasn’t convinced the smudging was working, but what did work well was to use the H pencil over panel lines. Due to the sheer amount of primering (SP? seriously, am I just making up words?) I had to do in order to smooth out the problem areas (that I caused :/) I probably wasn’t going to get much success out of a wash, so I was thrilled to see that the pencil worked very well. If you want mild panel lines, grab a nice hard-graphite pencil and something to keep your line straight (I used Dymo tape – nice and thick so it won’t crumple when the pencil comes by, and sticky-backed so it would stay in place.)
At this point, it was time to seal the model in preparation for decals. Another tip I’ve picked up is using Pledge Floor Polish (formerly called Future, or Klear in Europe) as a base for decals. What most people outside of the hobby don’t know is that this floor polish (this one, in particular, from what I understand) is really basically just pure acrylic. That’s right – when you mop your floor with this stuff, you’re painting it with acrylic paint. And that’s why alcohol works so well to remove it – alcohol also breaks down acrylic paint. And let me tell you, this stuff is impressive. It airbrushed straight out of the bottle, no thinning, and a good coat will smooth itself down into a nice glossy surface. It apparently can also be hand-brushed and because of its settling tendencies, it will also be perfectly smooth. I will have to try this sometime.I let that dry a few days and then on went the decals. And that’s where I realized how lucky I was getting a second kit. Something had been bugging me since I got the original kit, but I couldn’t really figure out what it was. The decals included in the kit looked appropriately Russian, but I couldn’t understand why it had the red star that is found on military planes, and it didn’t occur to me, for some reason, why the standard Aeroflot logo and tail decorations weren’t there. And it was also at this point that I realized that my kit was missing one of the wingtip fences that I needed, and so I went back into the replacement kit looking for an extra. There I found a decal sheet that looked like I was expecting – Aeroflot logo, tail flag (or whatever that is,) etc. And then I looked more closely at the decals in my original kit and noticed that they were for the Su-27 fighter plane. If it weren’t for the replacement kit, I’d be out all of the standard A320 markings – everything besides the windows and livery, basically.
 |
| Just forward of The Mistake. |
Draw Decal includes some instructions that their decals are very thin and to be careful. They aren’t kidding. I managed to screw up the right-side emergency exit door decals and my attempt at fixing it wasn’t fruitful. The decal ripped and before I could get it back together again, one half had pretty much sealed itself to the paint, luckily in basically the right position. I made the best of what I could do with the remaining part. It’s not a complete disaster but it’s embarrassing enough that I didn’t even want to take pictures of it, and so have simply decided that the only way to see this plane would be from the left side. It’s nice having that power.
After that, I cut the decals into much smaller pieces and put them on one at a time, giving them ample time to dry before moving on. Decaling took the entire weekend. A WHOLE weekend. This is something that took me maybe a half-hour when I was young. And in between, I weathered with tiny dots of black and brown oil paints, letting them dry a bit and then dry-brushing them into streaks. It all came out very pleasing to me.


Really enjoyed your article- made me burst out laughing at one point. I’m building one of these myself and am extremely grateful for you pointers, esp. with the window pitfalls and the Draw decal issue (I have already bought some..) Btw, with regard to the windows, I discovered that very carefully slicing off the protrusions with a new knife blade and less than fingertip pressure really worked well. Polishing was easy too. However I discovered the issue after the fuselage and wings were assembled- sigh. You produced a fantastic looking model- great photos, well done!
LikeLike